Wednesday 24 December 2014

Merry Christmas

After a year of ups and downs, I would like to thank all my likers, family and friends for your continued support in my crafting journey. Lots more projects planned for 2015. Have a very Merry Christmas and a Happy New Year
 
x x x x x x x x x x x x
 

Wednesday 12 November 2014

Tutorial - Decoupage Christmas Tree

Morning!

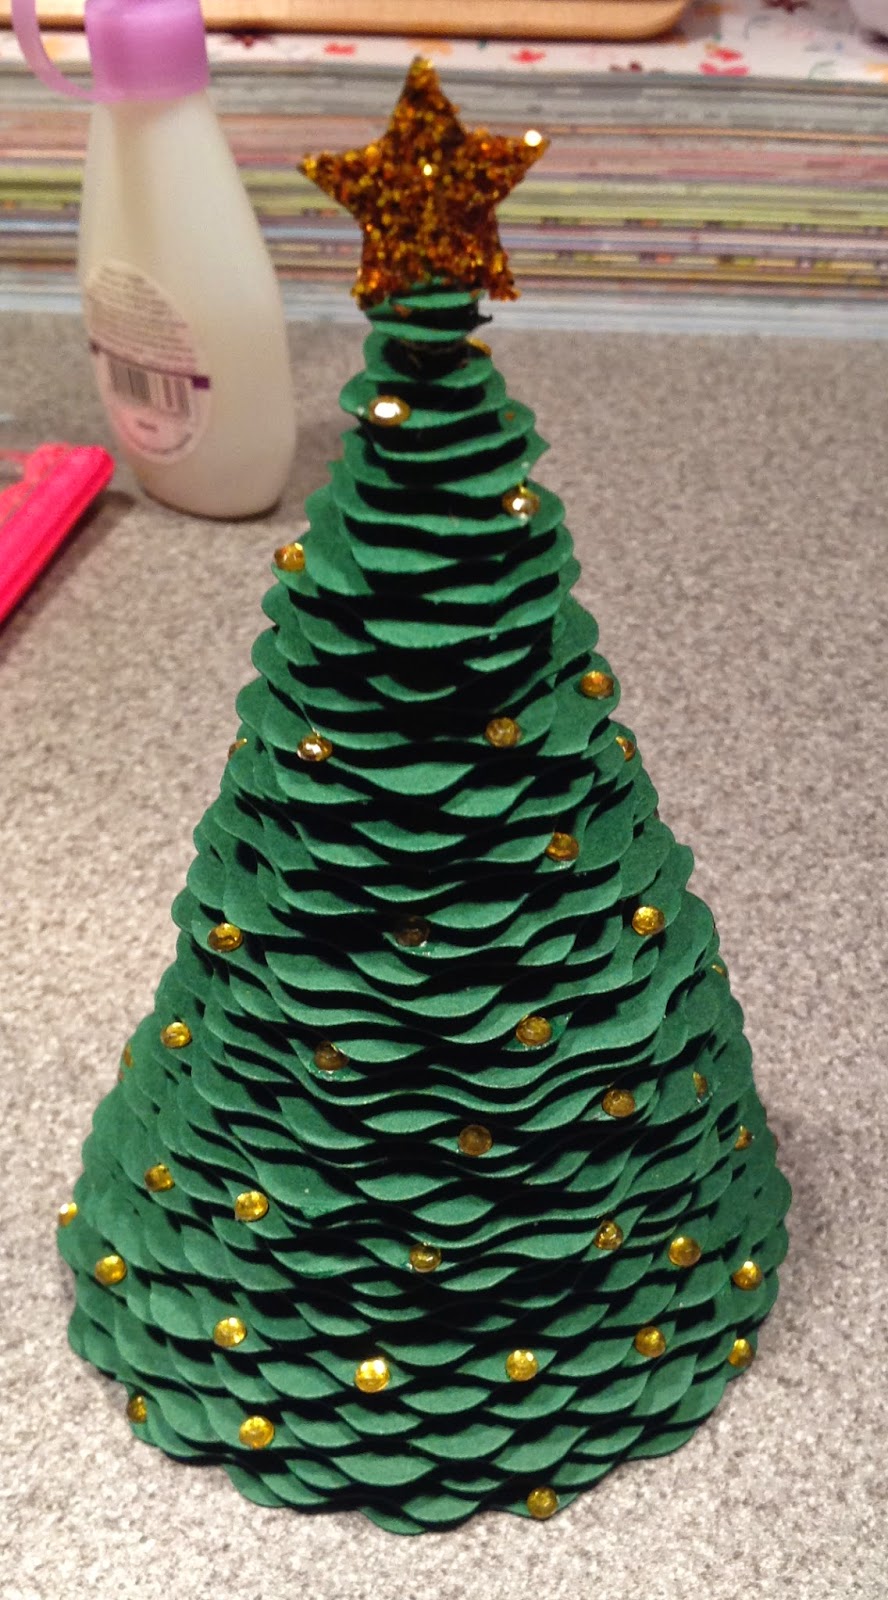
Lots of people on Facebook have asked me how I made this, so here's the tutorial.

You will need:
Green Card
A way of cutting wavy circles - a long way round I know (you may find an easier way) but I used the EK Circle Cutting Tool, the WRMK circle cutter and wavy scissors
Black Foam Pads (I used 2mm depth ones)
A star to go on the top (I used one from a  confetti pack)
Glue
Embellishments to decorate your tree with (I used 2mm Gold Adhesive flat backed crystals)
Glitter

Step 1. Cutting your circles
I went the long way about doing this but it works for me. When I get a cutting machine again it will be much easier and quicker. I cut circles of card every 16th from 3" to 1" using the EK tool. From 1" to about 4/16th, I cut 4 circles using the WRMK tool. For those of you who aren't au fait with inches. it's every mark on the inch ruler


Cutting my circles...


This is what you end up with:

 
Then using my wavy scissors, I cut inside each circle, making sure the top of the wave cut just inside the edge of each circle.


They end up looking like this...


They're not design to be perfect. You will end up with points along the way, where you've start and stop cutting the waves with your scissors.


On the smaller circles they will look very odd and misshapen, but it doesn't matter, trees aren't perfectly symmetrical. I think it adds to the effect.


Step 2: Adding Pads and Layering
Start adding your pads. I used 5 on the larger circles, then went to 4,3,2,1 and pads cut in half for the very small ones. Do one at a time, then add your next layer...

 
When you add your next layer, make sure the waves show between the waves of the previous layer. This becomes more difficult as the layers get smaller and more misshapen. You also need to make sure you are placing your layers as centrally on the previous layer as possible.


Keep padding and layering....

 and layering!...


STOP when you have 2 layers left to do. If you are adding a star you need to do this now. If you are doing a plain tree, you can continue adding the last 2 layers.
 

Step 3: Attaching your star.
Make a small hole in the middle of your star.


Thread your wire through the hole. bring it back together in one of the spaces between the star's points and twist together so you end up with one wired end...


Cover your star in glue on both sides and coat with glitter. This will hide the wire.


If you've used the same cutting tools as me your smaller layers will already have a small hole in the middle, left from the WRMK tool. If not you need to make a small hole with a pin or something similar in both of the top remaining layers. Select the smallest layer - the top one - and push your wire through top to bottom...


Add pads to the underneath of this layer. As its so small I ended up cutting a pad in half. Remove the backing paper from the pads ready to stick...


Select the 2nd layer - the only one left now - and poke your wire through this one top to bottom. Push these 2 layers together so the pads stick.


Add pads to the bottom of the second layer, ideally a half either side of the wire...

 
Wind your wire around the pads and neatly tuck the end in between the two to keep it out of site...


Remove the backing from the pads and add to the top of your tree...

 
For the branch decoration, you can add as much or as little as you like. I chose to just add gold adhesive crystals. I marked with a pencil where I wanted them so I got an even distribution.

 
Hope this all makes sense. If you need any more tips on this, notice I've missed anything or need more help, please get in touch.


Monday 10 November 2014

My Mojo's back and Christmas is coming!

Morning All,

I can't believe so long has passed since I last posted....and yet in other ways I can.  I have taken on the voluntary role of Fundraiser for Playgroup which is keeping me more than busy. Hubby has been off work with work related stress and continuing symptoms of his Post Concussion Syndrome and Elliot has started to -well I can't call it crawling - swivel, shimmy, roll to get around. So with this and the ever active Sophie, finding time to craft has been difficult, almost impossible. For a while, I had no inspiration whatsoever, not even any ideas swimming round in my head, but with the constant nag that Christmas is on the way and a few personalised requests, I made myself sit down and start.

Here are my recent personalised makes:

Unlike the ones I have seen online which are just prints, I wanted to try this in a box frame with raised letters on some words and flat words on others to give it some depth. Quite pleased with the final result, although it was hard work cutting out all the letters by hand and will be much easier when I have a cutting machine again.


I was asked to make a personalised christening card. I have a Sizzix Texture Boutique which is giving me lots of food for thought at the mo and I love using it. I'm getting into embossing a lot more recently. I also have some really nice punches that I don't use enough. When I was making all the components for this card, I thought it might look too much altogether, but actually I am really pleased with the finished result.


My final recent make was just yesterday and it's had a great response on Facebook. I've had this idea for a 3d Christmas Tree going round in my head for over a year now. I did have a cutting template for something similar but can't use it as my machines broke. So I needed to go back to basics to achieve a similar effect.  Here it is....


Really pleased with this. It took ages, but now I know what I'm doing, the next few shouldn't take as long, I've been asked to do a tutorial on this, which will appear on here in the next few days.

That's all for now. My mojo's definitely back, must get on!

Monday 1 September 2014

New Craft Area - Downsizing :-s

Hiya!

So for about a year now I knew I would have to give up my craft room for our imminent baby boy (who is now 7 1/2 months) and move somewhere else in the house, no doubt smaller.  The challenge was finding somewhere that was suitable for me that would give me some working space, storage and easy access to the kiddies and easy access to me for them (Does that make sense?)

So we ripped out a pointless coat cupboard in the hallway and my very kind hubby put in a desk for me. In the last few days, I've put up shelving in the adjacent cupboard and made 2 drawers for my inks and stamps and here we are.

Dadaaa!


I still have a bookcase upstairs in the office for things I don't use all the time, extra storage and storage for stock, but this is my main home now.  I've just got 2 more units to make, one to hold all my ribbons and one to hold my machines (cutter, embosser and foiler).
 
 
I finally finished tidying it all today and getting everything away. Still more to do upstairs but happy with this area now. 
 
What do you think? :-)


Sunday 31 August 2014

Online Craft Fair Today

Morning Peeps,

Just letting you know I am taking part in an online craft fair today between 11.30 and 4.30 on Facebook, along with a few hundred other crafters! A perfect opportunity to buy special gifts, particularly if you're starting to think about Christmas Presents.

https://www.facebook.com/events/1429956127293374/

Thursday 28 August 2014

New projects

HI everyone,

I know I've been a bit quiet since the website launch at the beginning of the month... been busy! Besides taking a weeks holiday with the kiddies in Wales and being ill for a week, I've been making bits for orders and thinking about my Christmas Collection.

Here are two of the orders I've made this month, an order for 85 place cards for a wedding where they'd been let down at the last minute...


and a jewellery order...


Now, I'm thinking about my Christmas Stock. Yes I know it's still August, but a lot of other companies are launching theirs now and I am already receiving enquiries about Christmas items, so I'm starting now so I don't have such a manic rush!
 
Speak Soon


Monday 4 August 2014

New Website

Hello everyone,

Well it's finally live!  After aiming for Friday night, it just didn't happen, so many things wouldn't work. I guess that's what you get for being a website building virgin, not really understanding what I was doing and struggling with the extra steep learning curve.

Now, I feel such a sense of achievement. I know there's a long way to go, but my internet presence is live :-)

Now I'm on a craft tidy up and sort out session, to sit down and starting some making again.

Speak soon

Saturday 26 July 2014

Less than a week to go!

Morning!
Scarey!, less than a week to go until the website is finally launched! I can't describe how I feel right now, it's all a mixture of excitement, determination, relief, happiness, hopefulness.....the list goes on. This has been a very long time in the making.
No pics today, just wanted to get that off my chest!
See you soon

Wednesday 16 July 2014

Mens Wallet

Afternoon All,
Just a quick post as I wanted to share a new product on here which I thought might interest you. Its a man's wallet card. Complete with pockets and photo holder. The insert even has space for you to write on.